Phoenix Computer Repair and Business IT Support | Expert Solutions You Can Trust


Computer Repair Experts in Phoenix, Arizona. my PC Techs Presents:

Tech Tips - Business IT Support Tips


RSS feed for my PC Techs news  RSS Feeds: Entries (RSS) and Comments (RSS)

Pages

Tech Tip Archives
Log in

Which Do You Use Most Often for Work?

View Results

Loading ... Loading ...

Windows 8 System Requirements

March 4th, 2012

The Windows 8 Consumer Preview is now available to download, giving you the chance to try out the latest operating system from Microsoft. Whether you have a logo PC or you’ve built your own PC, the recommendations for the Consumer Preview include:

– 1 GHz or faster processor
– 1 GB RAM (32-bit) or 2 GB (64-bit)
– 16 GB hard disk space (32-bit) or 20 GB (64-bit)
– DirectX 9 graphics device with WDDM 1.0 or higher

This setup gets you going with Windows 8 such that it is functionally equivalent to Windows 7, and as we have talked about previously, you should see measureable improvements in performance in a number of dimensions with a system at this level.

One new element to Windows 8 is the requirement that Metro style applications have a minimum of 1024×768 screen resolution, and 1366×768 for the snap feature. If you attempt to launch a Metro style app with less than this resolution (e.g. 800×600, 1024×600) you will receive an error message.

Since the software is in everyone’s hands now, we will follow up with a more detailed blog post where you can learn more about the work we did for scaling across multiple resolutions and why this is a requirement in order to make sure developers can easily build applications that scale well across resolutions. We chose to allow Windows 8 to install even when a system doesn’t meet this requirement because, even without Metro style applications, your Windows 7 workloads on these PCs will improve and you can benefit from all the other features of Windows 8, including enhancements to the desktop. We have made sure that Start and Settings all scale well on 800×600 resolution screens.

Visit the offical Windows 8 Consumer Preview download page for more details.


>> Did you like this article? Ping it!


Using CleanMgr to Reduce File Clutter

February 15th, 2012
There have been countless articles written to help you with reducing temporary files that clutter your hard drive. Windows performs cleanup for most of these files under normal circumstances, but control over the process is limited. To gain more control over these files, you can use CleanMgr as part of a normal monthly maintenance cycle.

In a modern Windows OS, when you click Start/Accessories/System Tools/Disk Cleanup you will note a dialog which will eventually present you with choices of files to remove from your computer. These are left over files from various activities and will look something like this:
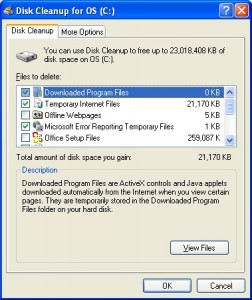
Disk Cleanup can assist you in removing no longer needed files

Now you are able to select the categories you want to remove, for example, Temporary Internet Files, Microsoft Error Reporting Temporary Files, Recycle Bin, Temporary Files, WebClient/Publisher Temporary Files, etc. Note these are all temporary files. There are also other categories you should normally never select. These include Office Setup Files, Log Files, Compress Old Files and Catalog files for the Content Indexer. Please note Windows Vista and Windows 7 users will have more options available.

If this is the first time you have ran CleanMgr (Disk Cleanup), the initial scan process could take quite some time. These scan’s may take in excess of an hour. Microsoft had provided a way to streamline this process through preferences, but you have to use the Command Prompt to take advantage of it.


To get started we’ll need to use the CMD prompt. Alternatly, you can “Run” a command from the “Start Button” this will work too.

Let’s start with the CMD prompt:

For Windows XP click Start/Run/CMD

For Windows 7 click Start/All Programs/Accessories/Command Prompt

This will open a Command Console allowing you to type in the following command:

cleanmgr.exe /sageset:99
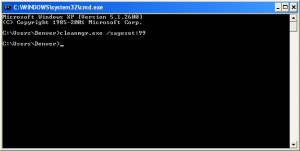
Running CleanMgr from the Command Prompt

This will bring up a new Disk Cleanup Settings window
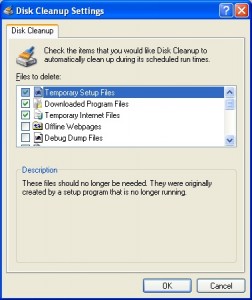
Using the Sageset switch

On Windows XP computers, you should usually select the following categories: Temporary Setup Files, Downloaded Program FIles, Temporary Internet Files, Microsoft Error Reporting Temporary Files, Old Chkdsk files, Recycle Bin, Temporary Remote Desktop files, Temporary Files, WebClient/Publisher Temporary Files, Catalog files for the Content Indexer. Optionally you could select Debug Dump Files and Offline Webpages as well. You should almost NEVER select Office Setup Files.

On Windows 7 computers, you should usually select the following categories: Temporary Setup Files, Downloaded Program Files, Temporary Internet Files, Debug Dump Files, Old Chkdsk files, Recycle Bin, Service Pack Backup Files, System error memory dump files, System error minidump files, Temporary Files, Temporary Windows installation files, Thumbnails, Files discarded by Windows upgrade, Per user archived Windows Error Reporting Files, System archived Windows Error Reporting Files

Once you have made your selections, Click OK.

Now that you have saved your settings, run the following command:

cleanmgr.exe /sagerun:99
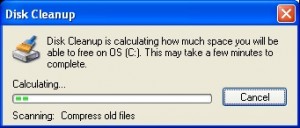
The Sagerun Switch

This process could take some time to complete and will run on all attached drives. So if you have network drives or external drives you do not want included, be sure to disconnect or remove these drives.

For more information about using CleanMgr from the command line please reference:

http://support.microsoft.com/default.aspx?scid=kb;en-us;Q315246 (for Windows XP)

http://windows.microsoft.com/en-us/windows7/Delete-files-using-Disk-Cleanup (For Windows 7)

my PC Techs provides expert computer repair and computer consulting services to the Phoenix metro area. For more information or to schedule an appointment please call (602) 456-0150.
Happy New Year!

January 1st, 2012

Happy New Year to our friends, family, and clients.
Social Network Arizona
seen BEST Web Design
my PC Techs


>> Did you like this article? Ping it!


Strange Verizon SMTP Email Issue

December 21st, 2011

A client recently reported a problem with 10 user laptops. Users could receive email, but sending email resulting in a 550 5.7.1 error via bounce back. Accounts were configured through Outlook 2010 with SMTP to a corporate Exchange server.

Interestingly enough the laptops were connected to the internet with Verizon 4G modems. They were able to download files, surf the internet, and do pretty much everything else as normal. No settings on the laptop, Outlook 2010, or the Exchange server had changed from one day to the next.

We ruled out the Exchange server by sending from Outlook Web Access as the user. We ruled out the user SMTP account by sending from a stand-alone desktop machine as the user. We then ruled out the laptops themselves by connecting them to a hard wired LAN connection and sending from Outlook 2010 without any problem. The only time we experienced the 550 5.7.1 error was when connected using Verizon 3G or 4G.

Could these recent problems with the Verizon network have something to do with it? We updated the VZAccess Manager software to the absolute latest version (Help / Check for Updates). During that process the firmware of the device was updated as well.

Surprisingly, after the Verizon software and modem updates it was possible to send email again. Hopefully this helps anyone else who is having trouble sending email through SMTP while connected to a Verizon 3G or 4G modem. Upgrade your modem!


>> Did you like this article? Ping it!


Adobe Acrobat and Adobe Reader Security Update

December 16th, 2011

A bug was found recently in version 9 of the Adobe Reader and Adobe Acrobat software that would allow an attacker to take over your computer or steal data. Any time you open an infected PDF from your computer, on the internet, or sent to you via email you could be at risk. For all versions of Adobe Acrobat and Adobe Reader, keep yourself safe by updating your software and following these steps:

  • Download and install the latest security updates from the Adobe Product Updates page.
  • You can also check for updates from within Acrobat by going to Help, Check for Updates.
  • From within Adobe Reader or Adobe Acrobat, click on Edit/Preferences. On the left go to the Trust Manager tab, then uncheck the box ‘Allow opening of non-PDF attachments with external applications.’
  • From within Adobe Reader or Adobe Acrobat, click on Edit/Preferences. On the left go to Javascript, and uncheck the Enable Javascript box.

Close the program.

As always, you should also have a good anti-virus running on your system. We recommend Trend or Microsoft Security Essentials.


>> Did you like this article? Ping it!


WE WORK HARD FOR YOU, BUT DON'T JUST TAKE OUR WORD FOR IT!
We've helped over 1,000 satisfied businesses throughout the Phoenix valley, click here to view some of their testimonials:

computer tech support near mePhoenix Computer Repair Testimonials on Google My Business My PC Techsmy PC Techs on TwitterFacebook Page for my PC TechsTech Support by United States Citizens Based in Arizona
Home | Computer Repair Phoenix | Managed IT | Web Development | Testimonials | Contact | Privacy | Pay | Blog RSS feed for my PC Techs news | Site Map

Phoenix Arizona: 125 N. 2nd Street, Suite 533 Phoenix, Arizona 85004
Phone: (602) 456-0150 | Email: admin@mypctechs.com
©2010 my PC Techs is owned and operated by Leo Polus, L.L.C., concept by Andre Morris
 

Managed IT and Computer Repair services for these Arizona cities: Ahwatukee, Carefree, Cave Creek, Chandler, Chandler Heights, Fountain Hills, Gilbert, Glendale, Higley, Laveen, Mesa, Paradise Valley, Peoria, Phoenix, Scottsdale, Tempe

To learn how Managed IT and Computer Repair services can help your Phoenix area business save money and increase productivity, click here to visit Phoenix Computer Repairs.

my PC Techs | Expert IT and Computer Repair Solutions You Can Trust | (602) 456-0150